
Last year, I created a tutorial for georectifying a digitized map and loading it into Omeka’s Neatline platform. In this 2 part tutorial, we will explore how to load a georectified map into other tools. First, we will put the map into Mapbox and then into Tableau.
Mapwarper –> Mapbox
You can use a GeoTiff file from anywhere, but for now, we will use files created on Map Warper (or its related site NYPL MapWarper). We are loading these GeoTiff files into Mapbox because Mapbox will convert GeoTiff files into raster files, host them on their servers, and provide an API for other mapping tools to use the raster-ized map.
Note: Mapbox is a for-profit company that provides its services on a freemium basis, so there are limitations on the size of the files you can upload (among a few other restrictions).
- Download the GeoTiff file from Mapwarper

- Create a free Mapbox account – https://www.mapbox.com/studio/signup/
- This is what the home dashboard looks like. Go to “New tileset”

- You will upload the GeoTiff file from wherever you saved it on your computer
(It will take a while to process, as Mapbox converts the tiff image file into a raster file)
- Now that you have created a tileset, select the options for the tileset and “add to style”
- In the top right of the “Add data to style” box, select “New style” and choose one of the style types provided. Then click “Create”
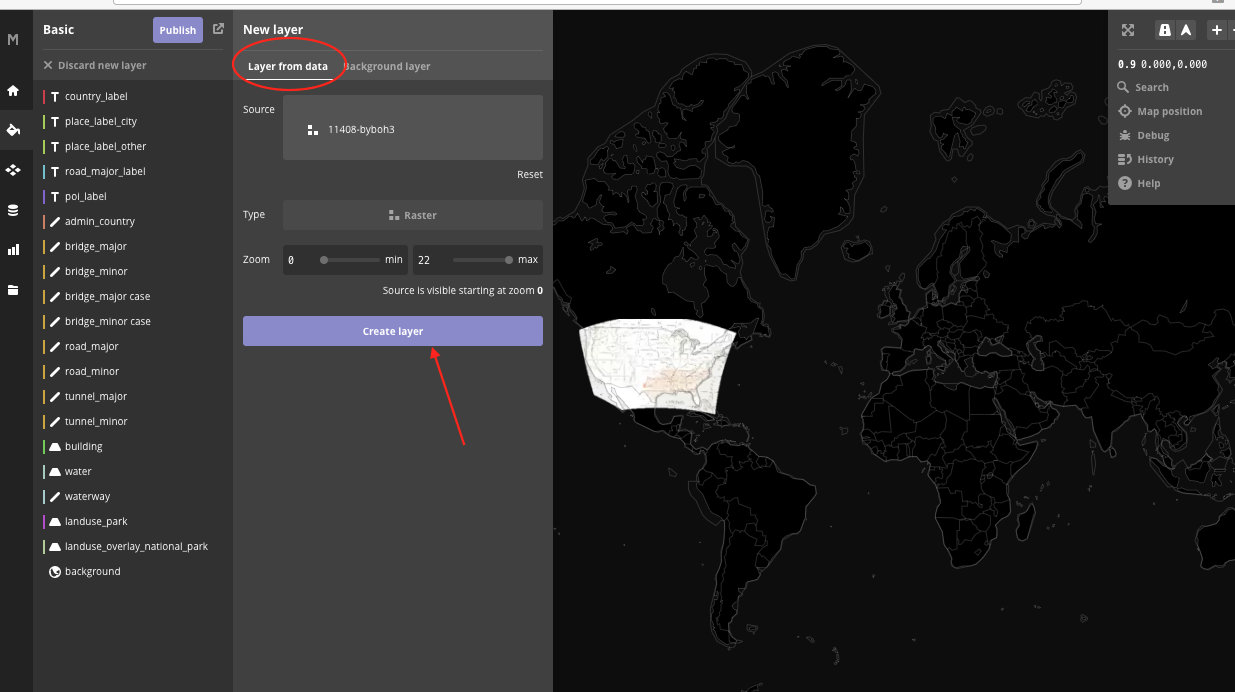
- There will be a display of the georectified map on a black map with two panes on the left of the screen. Leave the map as “layer from data” and click “Create layer”. If you choose “Background layer instead, the map will *only* display the georectified image/map, which is probably not what you want, because your georectified map probably isn’t of the entire planet.
- Now the background map has shifted to the basic type you selected earlier. Click “Publish” in the top left of the screen.
- Now, you will see your custom style in the “Styles” section. Click on the options menu to the right and note the “Share, Develop, and Use” option for later.


Now that you have added the map to Mapbox, you can load it into a range of mapping tools.
Mapbox –> Tableau
Tableau Public is a software you can learn how to use at this tutorial. In this example, I will use the data from that tutorial.
Note: Tableau is also a commercial software that operates on a freemium basis. See the longer disclaimer I included in the Tableau tutorial for further information.
- Create a Tableau Public account and download the application by entering your email address into the box in the center of the screen at https://public.tableau.com/s/
- Open the Tableau application on your computer, load in a dataset, open up a Sheet, select the Latitude and Longitude, choose the Map visualization, and drop the ID field into the “Detail” box in the “Marks” center panel. (Follow along or catch up with Steps 1-11 in the tutorial I created). The map will look like this:
- To load in the georectified map, select Map from the top options bar, then select Background Maps, then select Map Services
- Click “Add” then “Mapbox Maps”
- Give a name to the style for it to be inserted into Tableau. Return to Mapbox, to the “Styles” section, select the options to the right of the style you made earlier, select “Share, develop, and use”, scroll down, and select “Tableau” within the “Use Style in GIS Apps” section. Then copy the “integration URL” given.
- Back in Tableau, enter the “integration URL” into the “URL” field, and click “ok”
- Now your georectified map will be displayed on the Tableau map.
- Save to Tableau using your login credentials. The map will now be available on your Tableau profile page.


In Part 2 of this tutorial, we will look at loading the map into other mapping tools.

This work is licensed under a Creative Commons Attribution-NonCommercial 4.0 International License.
Pingback: Working with a Georectified Map (Part 2: Carto & Esri Story Maps) – Kristen Mapes
Pingback: Tutorial: Neatline for Historical Maps – Kristen Mapes
Pingback: Tutorial: Visualizing Data Using Tableau, 2016 Edition – Kristen Mapes